Mile a Minute Card idea

Mile a Minute cards!

I love a quick and easy card ideas.

The one I'm sharing today is something I call a Mile a Minute card.

I call it Mile a Minute because you'll get alot accomplished very quickly and there won't be any waste in your paper.

In one of my other favorite hobbies, crochet, there is a stitch pattern also called Mile A Minute.

In that pattern you crochet using double or triple stitches which covers more ground than the smaller single stitch.

I decided I would develop ways to bring short cuts to card making too!

Today I'm going to share some of those secrets to fast cards!

MileaMinute Quick and Easy card idea

Pick your favorite pretty paper!

For my cards I used a free paper I got from this year's Saleabration.

It's called Flower and Field paper.

It is a Level One Saleabration freebie.

It has beautiful flowers on one side and fun patterns on the other side.

This paper is perfect for my Mile a Minute pattern since you will want to use the opposite side of the same sheet of paper.


Let's get started with our pattern!


Mile a Minute Tip One

Choose your cardstock and accent piece cardstock based on the colors in the paper pack.

If you're using Stampin' Up! patterned paper (also called Designer Series Paper) the colors used on the paper are listed on the back of the package or in the catalog.

This makes coordinating papers and inks easy and it will get you the BEST results!

There are 14 coordinating colors used on this beautiful paper.

Choose 8 coordinating cardbases to match your paper.

I could have used 8 different colors since there were so many coordinating colors, but I used these colors for my cardbases:

I used these colors for accent pieces:

Mile a Minute Tip Two


Main paper:

Choose your favorite sheet of 12"x12" double sided paper.

Choose a sheet that you like both sides of the paper.

Determine if there is a distinct pattern as these instructions are for side opening cards. Make sure the pattern is going to run up and down before cutting the paper. Rotate paper is needed.

You will make 8 cards from one sheet of paper.


Cut the paper into three columns of 4" wide.

Cut the first two columns into 3" high pieces (total of 8)

Cut the last column into 1 1/2" high pieces (total of 8)


Accent:

You will need 8 pieces of accent cardstock strips that are 4" wide x 3/4" to 1" high.

I also used Petal Pink cardstock as a little accent to the Basic White strip.

This was cut using a retired die.


Mile a Minute Tip Three


Use one ink color to make quick work of your stamping.

For this project I choose Just Jade ink to stamp all my greetings.

You could use Memento Tuxedo black to coordinate easily with any paper you have!


Mile a Minute Tip Four


Choose greetings for similar occasions.

I choose to make Birthday, Thank You, and Thinking of You cards in one sitting.

I used the pattern to make 8 birthday cards, 8 thank you cards, and 8 thinking of you cards.

I'm showing samples of each style.

My greetings come from retired stamp sets, but you could find greetings in these current stamp sets:

Happy Thoughts

Treasured Medallion (part of the Treasured Medallion Bundle)

Oval Occasions (part of Oval Occasions Bundle)

Ride the Range (part of the Ride the Range bundle)


Mile a Minute Tip Five

Stamp your greetings onto scrap pieces of cardstock and make fast work of accenting the cards by using punches.

I choose greetings that would fit into two of my favorite punches:

Everyday Label Punch and

Rectangle Postage Stamp Punch (part of the Posted for You bundle)


Mile a Minute Tip Six

To make quick work of assembling the cards, cut layering pieces of cardstock.

For my cards I used Basic White pieces to adhere the patterned paper to before attaching to the front.

Layer pieces of cardstock were cut to be 4" wide x 5 1/4" high.

This layer piece allows me to line up the 4" x 3" patterned paper to the top and the 4" x 1 1/2" piece to the bottom. Then cover the middle with the piece of accent cardstock. 3/4" high will fit between the papers and 1" high will cover the papers slightly.

After the papers are adhered to this layering piece you can trim the pieces if needed (sometimes my cuts aren't exactly straight).


Bonus tip:


I will use one of these same layering pieces inside a card that has a dark color cardbase like Basic Black or Cherry Cobbler so I have a light colored surface to stamp a greeting or write a message.


The Mile a Minute pattern should help you make many, many cards for multiple occasions quickly. 


I hope you'll give it a try!


Feb 2021 - Card Kit in the Mail

February Card Kit in the Mail are SOLD OUT!

They included all new products including Saleabration items!

In fact one of the cards will use products that will be available in March as a sneak peek of the upcoming new annual catalog!

So much fun!

Birthday Card Bash card set 1

Cards shown are from a past kit and are only intended to show the quality of the cards in the kit.

Let us help you get a quick start on your card making needs!

The cards are designed to be versatile and could be made for almost any occasion!

You'll get a complete kit with instructions with color photos of the 8 card designs!

The kit will be pre-cut and will include all the embellishments and an envelope.

You just need to stamp your own greeting for the outside and something for the inside if desired!

You can order a single kit, one of each of the 8 designs for $25!

A double kit, gives you two of each of the designs for $45!

A triple kit will include three of the eight designs and your cost is $65!

For those of you who have your own product, and are a little more experienced at making cards, you could just order the instructions for $10.

Birthday Card Bash card set 2

Cards shown are from a past kit and are only intended to show the quality of the cards in the kit.

Kit will be available to order until Friday February 19 at 9 pm central time.

Card Kits will be mailed out no later than Thursday Feb 25!

Calling all Chicken Lovers

Where are my chicken lovers?!

Hey Chick and Hey Birthday Chick

Lol! No, I don't mean those of you afraid to love.

I mean those who have chicken decor in your home.

Maybe you have chickens in your yard, or shed, or a full blown coop!

I know there are several of you out there!

Yesterday Stampin' Up! launched not one but TWO NEW Bundles that are perfect for anyone that loves chickens!

There's the Hey Chick bundle and the Hey Birthday Chick bundle!

First, aren't those the cutest names?!

Both are perfect to make cards or scrapbook pages or decor for the chicken lovers in your life!

Or maybe make something for anyone that needs a smile!

After all, getting a card with one of these cute chickens on it would make anyone smile!

Second, let's look at the detail on those cards!

I wanted to share the cards above because they have a clever background technique that I'd like to share.

They have 3/4" x 4" pieces of cardstock and 3/4" x 3" pieces in matching colors to the card base.

They are arranged to create just a little bit of interest on the plain card base.

punch background on the Hey Chick card

Think of the possibilities!

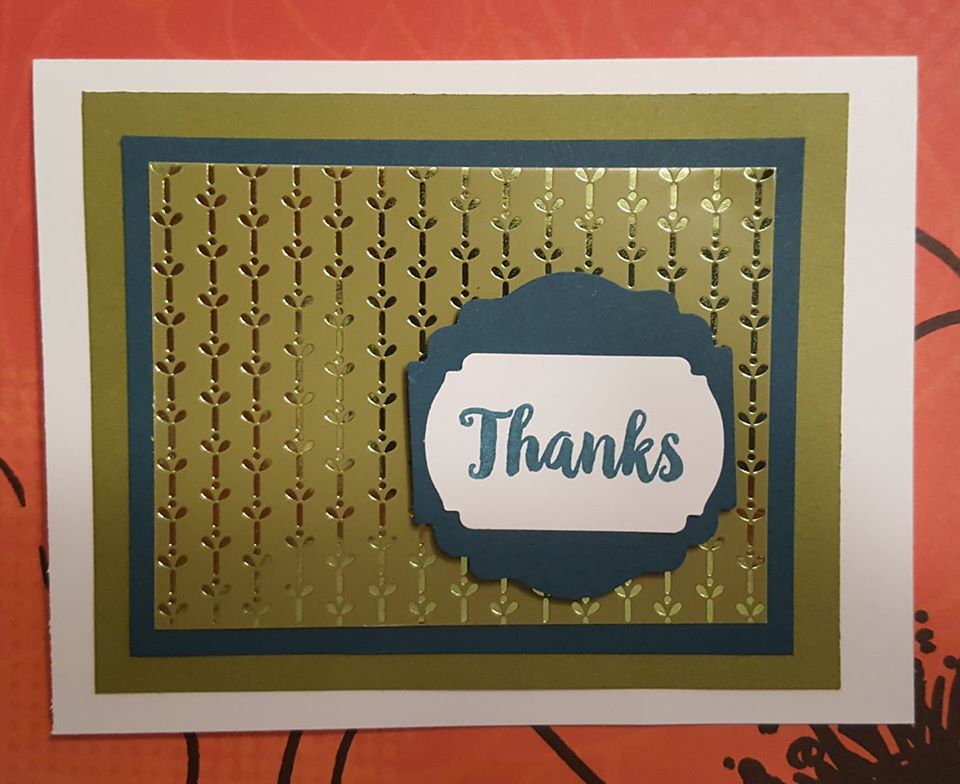
I adore the color combination of the middle card!


It's very fresh and I like how they punched out pieces of pretty paper using the Tailored Tag Punch.

Now, even if you didn't add the chickens, you could use that idea for a card!

Plus, if you don't have the Tailored Tag Punch it would work with any shape punch you might have!


Shop for the NEW Chicken Bundles here!


If Hey Chick sounds familiar or the stamp set looks familiar to you, you're right!

It was available as a Saleabration freebie in the past.


Now you can pick up the die set that coordinates with it!


Maybe you just want the stamp sets!


You don't have to get the dies, you could get the stamp set Hey Chick or the brand new Hey Birthday Chick which would let you make some cute things!

As I said, you could get just the stamp sets or just the dies, but then you wouldn't save 10% on the bundle and you might not qualify for Saleabration rewards!


Don't forget, you get to choose something for free with EVERY $50 purchase this month!


Hey Chick and Hey Birthday Chick

Check out the NEW Chicken Bundles!

Hey Chick bundle and Hey Birthday Chick bundle!

Two times the fun!

Two times the opportunity for Saleabration freebies!

Remember Saleabration ends in February, not March!

Don't delay!


Card Kit in the Mail 2021 - Birthday Card Bash

It's time for our first Card Kit in the Mail for 2021!

We're going to be having a Birthday Card Bash!

Let us help you get a quick start on the Birthday Cards you'll need for the year!

You'll get a complete kit with instructions with color photos of 8 cards!

The kit will be pre-cut and will include all the embellishments and an envelope.

You just need to stamp your own greeting for the outside and something for the inside if desired!

Card kit is SOLD OUT! Instrucations can be purchased.


Snail Mail - You've got Mail

Please accept this free tutorial as my thank you for visiting my blog today!

It features one of the fun Suite Collections (Snail Mail) in the new January to June Mini Catalog!

If you decide to grab this collection for your very own during January or February you can also qualify for at least one Level One Free item from the new Sale-a-bration catalog.

Snail Mail Suite Collection

Maybe add in some of the paper or ink needed for the project and you can qualify for another Level One item or maybe you'll be bumped up to Level Two.

If you add in the all new Cut and Emboss Machine you might even qualify for bonus HOST REWARDS of the exclusive stamp set Punch Party!

A fun stamp set that coordinates with many of the punches available right now!

I'd love to provide you with more tutorials like this, so if you join my weekly inspiration email list you'll get all the ideas, stampin' tips, and hear about the sales specials right away!

Quick Cuts make for Quick Cards

Christmas paper idea


One of my all time favorite Quick Cuts is to cut a piece of 12x12 paper into 12 equal size pieces.


The card above uses that technique with the plaid paper being cut 3" wide x 4" tall.


This gives you 12 pieces of paper to make 12 cards quickly!


Layering Tip!


I layered the paper with a slim accent (Old Olive) that is 3 1/2" wide x 4 1/2" tall.


Then to add another accent I went a little wider and cut the white paper to 4" x 5 1/4".


Punches make great layers!


I love to play with the punches I have on hand to create interest for a greeting. You will notice I used three shapes for this greeting.

The main focus punch on the card above is from a retired project kit tin.


Maybe you have this punch in your stash, but if you don't you could pick up the Timeless Label or the Label Me Fancy punch instead.


This one is layered over the Everyday Label punch (my absolute favorite greeting punch) and a scalloped edge circle punch which is retired


A current option could be the Label Me Lovely punch.


The card below has the Label Me Lovely punch under the Label Me Fancy punch.


Looks good together, doesn't it?


It also uses a similar Quick Cut. This time the paper is cut 4" wide x 3" high and put on a card in a horizontal format.


The accent layers are similar size only layered horizontally.


Such a versatile layout.

Another version below


I've done a similar idea but this time the 3" wide x 4" high paper is shown on a horizontal card layout.


To fill some of the "white" space along the sides I stamped tone on tone with stamps from a retired stamp set.


This is a fun technique that lets you add some interest without a lot of extra effort.


Another feature on this card is the circle under the Dog Builder Punch which adds a little POP color in a simple shape.


I hope these card ideas inspire you to craft this weekend!


Using the 3" x 4" or 4" x 3" Quick Cut you could make dozens of cards at a time very quickly this weekend.


If you're like me, you'll be making some Christmas Cards! It's not too late!


Now, get out there and make some cards!

Cyber Monday Offer

Digital Instruction Sheets

For the first time ever I have a Cyber Monday Offer! 

You can get five card set tutorials for half price! You'll get the instructions and cutting sizes for 40 card projects for only $25!

Use this quick order button for your convenience!

Digital Instruction Sheets


Merry and Bright 24 hour sale

Hurry! This sale on items from the full line Stampin' Up! catalog is for one 24 hour day only!

The sale starts Tuesday November 24 at 12:01 am mountatin time and ends at 11:59 pm mountain time.

It's a great time to purchase your Starter Kit! Instead of just getting the usual $125 in product for only $99

you can choose items in the sale and actually select $132 in products for the same $99!

Consider writing up your WISH LIST and have your loved ones shop for you that day! 

Get what you want and let them save!

Remember this sale is only 24 hours! Make your list NOW!